All timber substrates (including tongue & groove, particle board & plywood) must have at least 450mm of good cross ventilation under the floor to prevent distortion and movement of flooring members. Timber substrates should be rigid, sound, free from excessive moisture, cupping and warping and constructed to relevant building standards.Old timber substrates should have all loose boards re-nailed and badly worn or damaged boards must be replaced. Sand timber floors to a flat, smooth finish without undulations before installing Floor Core Hybrid. Planeness is to be no more than 3.0mm gap under a 2.0 metre straightedge at rest on any part of the timber floor
• IT IS A REQUIREMENT OF AUSTRALIAN STANDARDS 1884 – 2012 THAT A MOISTURE TEST IS CONDUCTED IN ACCORDANCE WITH APPENDIX A 3.1.2.
• Concrete substrates must be cured and completely dry. The surface must be steel trowelled to a smooth dense porous surface free of trowel marks, irregularities and undulation. Concrete slabs in contact with fill, hard-core or the ground must have a damp-proof membrane to prevent entry of moisture. Water proofing additives and curing compounds do not negate the need for a damp-proof membrane. New concrete slabs will dry at an approximate rate of 1.0mm per day, to be measured from the time the slab was last wet (for example, a 100mm slab will take 100 days to dry). This will vary depending on weather conditions and the surface of the concrete, (for example, a burnished concrete surface will take longer to dry). High spots and low areas on the substrate should be ground or levelled with appropriate self-levelling underlayment such as Ardex K15 (please ensure to follow the manufacturer’s instructions). If there is any doubt about moisture in the slab it is recommended to protect the Floor Core Flooring by using a 0.2mm (200 micron) polyethylene plastic sheeting, overlapped by 200mm and taped using a waterproof tape. The plastic sheeting should extend up the wall and be trimmed to the top side of the floor after the installation has been completed but before installing any scotia, mouldings or trims.
DO NOT
• Do not install it over a soft underlay (Soft underlayment or soft substrates will impact upon the products locking system and its indentation resistance).
• Do not install on loose timber or timber that has been directly glued on the concrete.
• Do not install on top of more then one sheet of Lino.
• Do not install over concrete with high moisture related subfloor. (Floor Core does not warrant or take any responsibility for performance issues should a floor be installed on a subfloor with high levels of moisture). A high moisture content in the subfloor may cause mould, mildew and moisture related issues.
• Do not install before testing the moisture levels. If a moisture level is over 40%, do not install Floor Core product. Your warranty will be null and void.
• Do not install if the concrete PH level exceeds a level of between 7-9.
• Do not install cabinets or island benches directly on top of the flooring.
• Do not fit flush against any fixed vertical surfaces like walls, permanent fixtures, door frames, pipes or staircases (minimum 6.0mm expansion gap is required).
• Do not attach to the substrate at any point (such as gluing the flooring directly to the subfloor).
• Do not compress the edges of the planks in any way when installing other flooring materials.
• Do not install over textiles of any type, such as carpet for example. It must be removed prior to installation.
• Do not install flooring into rooms without also having window covering such as blinds, shutters, venation and curtains to reduce the levels of direct sunlight and moisture to the new floor.
• Do not install in areas that are exposed to direct sunlight. Doing so may result in discoloration of the boards.
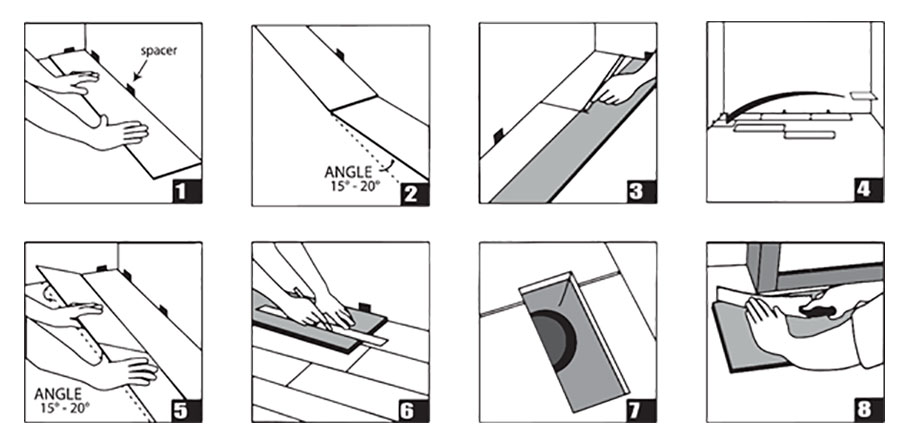
1. Installation should begin with a corner (right hand) and proceed from the wall with the tongue facing out and away from the wall.
2. Lay the first full piece with the small, tongue side facing the wall. When laying the first row in a straight line interlock the short ends by inserting the tongue into the grooves at an angle of about 15 to 20 degrees.
3. Install second and subsequent full pieces in the first row by aligning short ends of planks and locking into place.
4. Make sure to keep the seams between planks tight. You will feel and hear a click when locking the planks together to create a tight seam. There should be no gap visible between planks. If the seam appears not to be tight, you should immediately pull apart the planks and reassemble them. Slowly lift the top plank away from the bottom plank and simply reinsert it by following the previous steps.
5. Use spacers along all sides that butt up against walls to maintain 6.0 mm expansion gap.
6. Continue laying planks in the first row until you need to cut the last piece.
• 7. Measure the distance between the wall and the face surface of the last plank. Subtract 6.0mm and cut the plank using the drop saw. (See Required Cutting Tools above). If this distance is less than 250mm go back to the first full plank and cut approximately 250mm from the end closest to the starting wall. This will leave a longer piece at the end of the first row.